Friday, October 21, 2011

Published an ebook called "Small Solar"

Meeting my objective of having the new ham shack powered totally from solar energy proved to be a little less straight forward than I had imagined.

Along the way, I did a lot of research, talked to some very knowledgable people, visited some shops, attended an expo, and did some experimentation of my own.

An outcome of all this is that I've collected all my notes on solar panels, charge controllers, batteries and the sun; and published them as a low cost (under $3) electronic book.

This post is about how I made the book and got it out there.

I wanted to make the book available in the Apple iBookstore and Amazon Kindle. If you are not American it's difficult to publish through Apple's book store, basically you have to get an IRS (tax) number and that seems to involve sending your passport to Texas. They strongly suggest you go through an aggregator, as I already have a paper book on Lulu that was the obvious choice.

If you upload an ePub book, Lulu can distribute to Barnes & Noble Nook as well as Apple.

The book was created from the ePub template in Apple Pages. Pages can use the first page as the cover art but everywhere I've published they basically get you to make a cover design anyhow and ignore that embedded cover.

While Lulu can allocate you one of their ISBNs, your book is then listed as being published by Lulu, so I paid the $55 + $40 to get my own Australian ISBN (the $55 is a one time fee).

Uploading to Lulu is very smooth but I'd make your cover locally as a Jpeg rather than using their simple web-based tool. Lulu has yet to get the book into the iBookstore or B&N even though weeks have gone by. No idea what the hold up is but I'm not alone. Looks like there's a blockage somewhere at the moment.

My book was rejected the first time because I neglected to title the book in the form "Title: subtitle text here exactly as on the isbn". 24 hours later that was sorted.

Customers could buy the book on Lulu, download the ePub, and drag it to iTunes but that's hardly ideal and I look forward to seeing it in the actual store.

To publish to the Kindle store on Amazon you go to Kindle Direct Publishing (KDP). KDP will accept books in Word, ePub, Text, Mobipocket (.mobi), HTML, PDF, and RTF. I uploaded my ePub but Amazon's converter lost the table of contents and either lost or mangled images.

You can download some useful tools from amazon: Kindle Previewer App and KindleGen.

I found that the unspeakably ugly Calibre did a better job of converting ePub to .MOBI and I particularly like the ebook-convert command line tool which makes it as easy as this:

$ ebook-convert Small\ Solar.epub Small\ Solar.mobi
1% Converting input to HTML...
InputFormatPlugin: EPUB Input running
on Small Solar.epub
Parsing all content...
34% Running transforms on ebook...
Merging user specified metadata...
Detecting structure...
Flattening CSS and remapping font sizes...
Source base font size is 9.00000pt
Removing fake margins...
Cleaning up manifest...
Trimming unused files from manifest...
Trimming 'OPS/images/cover-image.png' from manifest
Creating MOBI Output...
67% Creating MOBI Output
Generating in-line TOC...
Applying case-transforming CSS...
Rasterizing SVG images...
Converting XHTML to Mobipocket markup...
Serializing images...
Serializing markup content...
  Compressing markup content...
Generating MOBI index for a book
MOBI output written to Small Solar.mobi
Output saved to   Small Solar.mobi

The output looks pretty good on a small greyscale Kindle although there are things to learn about writing for a small screen, tables aren't supported and titles need to be short to avoid unsightly wrapping.

I'd be charmed if someone would buy a copy. It's available now on Amazon and Lulu. Hopefully it will end up on iBookstore eventually.

Update

I'm happy to report that the book is now available in the iBookstore.


I found it on the iPad and it looks good. (Pardon my excitement). Nook is still pending at this point.

Thursday, October 06, 2011

Arduino SD data logger with time stamp

I've been learning about powering my ham shack with solar power and have been working on logging battery voltage to get information about how my power budget is going. At first I used an Arduino's A/D to read the voltage and periodically send it out the USB serial port, but as the shed has no mains power the laptop was a major drain on the battery itself. Yes, measuring was really altering the experiment.

An SD Shield Plus, purchased via eBay, has all the things you need for stand alone data logging. An SD slot, a battery backed clock, and even a bit of non-volatile utility ram.

My Arduino is a slightly older model, the Diecimila and I found that as soon as I called SD.begin() the device would reset. It turns out that the SD library code uses more ram than is available in the older models.

The new Arduino Uno looks like a good improvement. Aside from a more spacious Atmel chip, the USB interface is a processor itself and can be set as a HID device which could be handy. I ordered a couple of Uno's from Little Bird Electronics, and they shipped within minutes, but I still couldn't wait and went to Jaycar to pick up an interesting Uno clone called "Eleven" made by Freetronics.


I hacked together the sample code to write a log file to the SD card with a date time stamp from the clock chip in a format that a spreadsheet will parse. It reads three of the analog inputs and writes a line to the file every ten seconds. Here's the code for future reference:


/*
  SD card datalogger
  by Tom Igoe
  hacked by Peter Marks to write time stamps

 This example code is in the public domain.
 */

#include <SD.h>
// For the SD Shield Plus
const int chipSelect = 10;

// This is to talk to the real time clock
#include "Wire.h"
#define DS1307_I2C_ADDRESS 0x68  // This is the I2C address

// Global Variables
int i;
byte second, minute, hour, dayOfWeek, dayOfMonth, month, year;

void setup()
{
  Wire.begin();
  Serial.begin(9600);
  Serial.print("Initializing SD card...\n");
  // make sure that the default chip select pin is set to
  // output, even if you don't use it:
  pinMode(chipSelect, OUTPUT);
  Serial.print("chipSelect set to output\n");
  
  // see if the card is present and can be initialized:
  if (!SD.begin(chipSelect)) 
  {
    Serial.println("Card failed, or not present\n");
    // don't do anything more:
    return;
  }
  Serial.println("card initialized.\n");
}

void loop()
{
  // make a string for assembling the data to log:
  String dataString = getDateDs1307();
  dataString += String(",");
  
  // read three sensors and append to the string:
  for (int analogPin = 0; analogPin < 3; analogPin++) 
  {
    int sensor = analogRead(analogPin);
    dataString += String(sensor);
    if (analogPin < 2) 
    {
      dataString += ","; 
    }
  }

  // open the file. note that only one file can be open at a time,
  // so you have to close this one before opening another.
  File dataFile = SD.open("datalog.csv", FILE_WRITE);

  // if the file is available, write to it:
  if (dataFile) 
  {
    dataFile.println(dataString);
    dataFile.close();
    // print to the serial port too:
    Serial.println(dataString);
  }  
  // if the file isn't open, pop up an error:
  else 
  {
    Serial.println("error opening datalog.csv");
  } 
  delay(1000 * 10);
}


// Gets the date and time from the ds1307 and return
// result in a format a spreadsheet can parse: 06/10/11 15:10:00
String getDateDs1307()
{
  // Reset the register pointer
  Wire.beginTransmission(DS1307_I2C_ADDRESS);
  Wire.send(0x00);
  Wire.endTransmission();

  Wire.requestFrom(DS1307_I2C_ADDRESS, 7);

  // A few of these need masks because certain bits are control bits
  second     = bcdToDec(Wire.receive() & 0x7F);
  minute     = bcdToDec(Wire.receive());
  hour       = bcdToDec(Wire.receive() & 0x3F);  
  dayOfWeek  = bcdToDec(Wire.receive());
  dayOfMonth = bcdToDec(Wire.receive());
  month      = bcdToDec(Wire.receive());
  year       = bcdToDec(Wire.receive());
  
  String dataString = "";
  
  dataString += Print2Digit(dayOfMonth); 
  dataString += String("/");
  dataString += Print2Digit(bcdToDec(month)); 
  dataString += String("/"); // Y2k1 bug!
  dataString += Print2Digit(bcdToDec(year));
  dataString += String(" ");
  dataString += Print2Digit(hour);
  dataString += String(":");
  dataString += Print2Digit(minute);
  dataString += String(":");
  dataString += Print2Digit(second);

  return dataString;
}

// Convert binary coded decimal to normal decimal numbers
byte bcdToDec(byte val)
{
  return ( (val/16*10) + (val%16) );
}

String Print2Digit(byte Val)
{
  String dataString = "";
  if (Val < 10)
  {
    dataString = "0";
  }  
  dataString += String(Val, DEC);
  return dataString;
}

The output file looks like this:


06/10/11 15:36:16,555,489,479
06/10/11 15:36:18,461,427,438
06/10/11 15:36:19,419,401,414
06/10/11 15:36:21,397,387,404
06/10/11 15:36:22,394,389,403
06/10/11 15:36:23,380,375,393
06/10/11 15:36:25,386,383,399
06/10/11 15:36:26,382,380,396
06/10/11 15:36:28,380,378,395
06/10/11 15:36:29,387,385,400


Here's a few days of data. Today was partially cloudy but the battery was re-charged in the end.


Plotted with python and matplotlib with this:


#!/usr/local/bin/python

import datetime
import matplotlib
matplotlib.use('Agg')

import matplotlib.pyplot as plt
import csv

INFILENAME = 'datalog.csv'
VOLTSCALE = 665.0 / 13.7

def main():
    datareader = csv.reader(open(INFILENAME,'r'), delimiter=',')
    dates = []
    points = []
    for row in datareader:
        if len(row) > 1:
            #Converts str into a datetime object. 08/10/11 12:23:12
            dates.append(datetime.datetime.strptime(row[0],'%d/%m/%y %H:%M:%S'))
            volts = float(row[1]) / VOLTSCALE
            points.append(volts)
    
    fig = plt.figure()
    plt.plot(dates, points)
    plt.title("Battery Voltage over several days")
    plt.ylabel('Battery Volts')
    fig.autofmt_xdate()
    plt.ylim(ymin=8)
    plt.show()
    plt.savefig('voltgraph')

if __name__ == "__main__":
    main()
    

OMG Steve Jobs

"OMG Steve Jobs" was the SMS from my daughter. I'd been watching Google Reader only minutes before and it was clear this was set to be the biggest, and fastest spreading, story to date.


I feel like I felt in 1980 on hearing that John Lennon was killed.


News has evolved to be super-efficient in the last few years. A few friends and a few family sent SMSs, I chatted with others via instant messenger. Apple's home page was elegant.


I notice the image is called t_hero.png, but maybe that's normal.

The story is the lead everywhere.


Ironically, our prime minister, at today's "Jobs summit" made a statement and the US president quickly had something to say.


Nice of them to pass a "Jobs act" too.

There's some wonderful commentary starting to appear. I like Walt Mossberg's piece in particular.

I watched the iPhone 4S keynote yesterday, (thank goodness he held on until after that was over), Tim Cook did a fine job backed by a solid team. There was a downbeat feeling about the presentations, I wonder if they knew how close the end was, or perhaps they knew the wishful rumours of an iPhone 5 would mean they'd be unveiling something a little disappointing.

Even today, thirty years after Lennon's death, I wonder what he'd say about Occupy Wall Street. I, for one, will be thinking "What would Steve do" for a long time to come.

Wednesday, October 05, 2011

Open wire fed doublet antenna

Since moving the ham radio station to the new shed, which is located in the back corner of our block, it has become practical to use an open wire line feeder to my dipole.

I've often heard that the most versatile and efficient antenna is an open wire feeder to a doublet on the lowest band desired. This antenna can be then tuned to any band. I ordered some nice copper wire and spacers from TTS Systems. I'm using dipole centre pieces from Emtron which I like very much.


The open line runs from the shed out to the back yard. It's not quite as wonky as it looks below.


The wires pass through the wooden wall of the shed and straight in to a 4:1 balun and then to an antenna tuner.


I plan to re-jig things a bit and try to go direct into a balanced line antenna tuner to avoid the co-ax run in the shed.

TTS Systems were good to deal with and they dispatched quickly but I was disappointed to find that three of the spacers were faulty (missing centre hooks on one end) which seems like poor quality control given such a small order.


The dipole doesn't have enough space for 80m so it has substantial drooping ends in order to work on 80m. My plan is to replace these drooping ends with loading coils.

Update

I've cut the dipole for 40m and dispensed with the half size G5RV that's been my main antenna in recent months. I'll have to make other arrangements for 80m, perhaps some sort of end fed system.

It's hard to compare antennas on HF due to the incredible changes in conditions but it sounds good and very low noise to me.

Sunday, September 25, 2011

Audio for radio communication

Today at the ARNSW Home Brew meeting at dural, Mathew Magee, VK2YAP gave a talk about audio for radio communication. He spoke for about an hour and I've roughly edited it down to 17 minutes.

The noise in the background is heavy rain on the metal roof. Thanks so much to Mathew for giving permission for me to record the talk.

Friday, September 23, 2011

Lazy days at Port Stephens with dolphins

This week we took a couple of days out, during off season, north of Sydney at Port Stephens. The water must be very clean here as dolphins swim right up to the jetty:


We went on a "wave watching" boat trip and the dolphins like riding the "pressure wave" at the bow of the boat apparently for the fun of it:


While wandering around, I had a play with the new Instagram for iPhone.


It emulates bad analog film to good effect.


I spend a lot to get a lens that doesn't vignette and yet it is kind of nice.


This narrow focus effect doesn't work so well for me. It seems artificially abrupt.


During our time away, I did have to work but was able to do it via a 3G modem without any trouble.

The place we stayed was virtually empty. I took the UV-3R and listened in to the marine VHF channel 16 on 156.800 which was kind of fun.

Monday, September 19, 2011

UV-3R Torch with bonus VHF/UHF/FM SDR Radio

A new toy just arrived...


While not quite a "gift", for AU$40 (+$15 postage), it's pretty cheap for a tiny transceiver with a state of the art software defined radio inside. The feature that gets most prominence on the box is the "high illumination flashlight" feature.


I bought via eBay out of Hong Kong and it turned up 9 days after I ordered, which seems excellent. Despite the box getting a bit of a bash, all was well inside.


This one came with a USB programming cable, Windows software, separate antennas for VHF and UHF, a soft case, charger and charging dock. It seems to work fine.

These units set an amazing low price point and while the quality of the plastic is not as good as a "name brand" rig, given the advanced technology inside, the UV-3R is leading to a lot of discussion and even modifications.

Check out:
From the data sheet: "The RDA1846 is a highly integrated single-chip transceiver for Walkie Talkie applications. It totally realizes the translation from RF carrier to voice in the RX path and from voice to RF carrier in the TX path, requiring only one micro controller.

The RDA1846 has a powerful digital signal processor, which makes it have optimum voice quality, flexible function options, and robust performance under varying reception conditions.".


I wish we would see this technology in low cost HF equipment.

Thursday, September 15, 2011

Solar powered ham shack gets a new controller

The new ham shack is up and running. The 65W solar panel is placed simply on the north facing side of the roof. There is some shade during the day but it seems to be producing enough for my operating time.


The little charge controller supplied by Jaycar was really meant for a night light so I purchased something more elaborate from Hong Kong via Ebay made by ProVista Technology. It's a very nice unit.


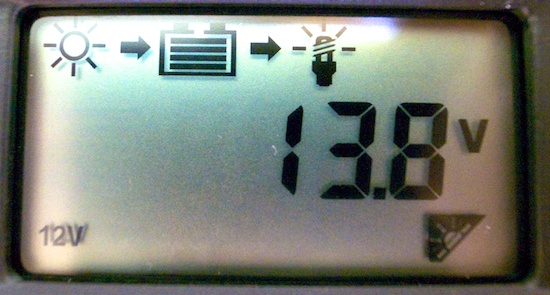
It's an ISC3020 which is rated at 30A input and load current. It has a very informative multi-page LCD display. Here it is both charging and supplying power and the battery is at 13.8V.


Both current drain and charge current are available. Here's charge current of 4.8A.


I paid AU$75 + $20 postage from Ebay seller greensolarwind and it came in 10 days.

Monday, September 12, 2011

Ham shed build

Ever since we filled in the swimming pool a few years back, I've noticed that there's enough space in the back yard for a shed. Here's a likely spot:


This morning the truck arrived with all the bits.


Although offered as a kit, I'm glad I paid to get the guys to do the construction for me. The sheer weight of some parts, such as the solid floor would have been difficult for me, let alone getting the walls up and square. This shed is 2.3m x 2.9m.


It's on piers but has a very solid floor over that. I'm confident it will not be flooded even in the biggest rains we've seen. After the floor was done, the walls went up quickly.


The walls are pretty solid wood and I'm hoping they'll provide enough insulation for winter and summer nights. If not I'll add insulation and lining later.


Definitely a two person job.


Almost to lock up stage after a couple of hours:


We had some extra carpet stashed away which makes it rather luxurious. It's going to take a while to get all my radio and electronics bits arranged satisfactorily.


The solar panel was simply laid on the roof and I'm keen to see how practical it is to power the whole operation this way. For now I'll run an extension cable out with mains for soldering iron and CRO but later I'll probably get mains power on.

Re-routing antenna coax is going to take a bit of time but I expect to be back on air within a day or so.

I can recommend the supplier Outdoor Living & Lifestyle and their installers are just wonderful blokes. They even had an industrial strength radio, that runs on the same rechargeable batteries as their tools, to keep them entertained:


I looked at metal sheds, they are much cheaper (particularly if you don't count the concrete floor you need to put down), but in the end spent $3,600 total for what you see above, including delivery and installation.

Friday, September 02, 2011

Towards a solar powered ham station

Great news, I'm getting a shed. Every man needs a shed and the plan is to move my ham radio gear into it.

It's still a few weeks off but I'm going to try to power it mostly from a solar system which ideally should be able to keep a small WSPR station going indefinitely.

Solar panels seem to vary a great deal in price, specialist solar shops seem very expensive, Jaycar is in the middle, and eBay vendors are suspiciously cheap.

There are rumours around that the cheapest solar panels in from China lie about the power output and that's why they are so cheap.

I purchased a 65W panel with a small charge controller from Jaycar for $400 and also bought a 26Ah battery. I don't recommend this particular charge controller, Powertech MP3128, as it's designed to run a night light (the sales person didn't mention this). The load voltage only comes on when the solar panel is in darkness, so I'm connecting direct to the battery which risks fully discharging it. Better controllers monitor this and protect the battery.

To see if I can keep a station going, I've rigged up the solar panel, just next to the house, only vaguely north, the charge controller and a transceiver that draws 1.3A on receive, and rigged up a very simple voltage logger using an Arduino and a netbook. (I won't use this transceiver for WSPR but thought it was a good test load for experimentation).


The Analog input on the Arduino measures up to 5V so I'm using a roughly 4:1 resistor voltage divider to feed it. The software in the Arduino sends a measurement every 5 seconds over the USB serial link. On the netbook, I use pyserial to read lines with the measurement, prepend the date time stamp and append to a file.


Here's the Arduino code:

const int analogInPin = A0;  // Analog input pin
int sensorValue = 0;        // value read 

void setup() {
  // initialize serial communications at 9600 bps:
  Serial.begin(9600); 
}

void loop() {
  // read the analog in value:
  sensorValue = analogRead(analogInPin);            

  // print the results to the serial monitor:

  Serial.print(sensorValue);
  Serial.print("\n");      

  // wait before the next loop
  // for the analog-to-digital converter to settle
  // after the last reading:
  delay(5000);                     
}

Here's the simple python code on the netbook:

import serial
import time

DEVICE = '/dev/tty.usbserial-A4001KYJ'

ser = serial.Serial(DEVICE, 9600, timeout=60) # 60 seconds

line = ser.readline().strip()
while len(line):
    print "%s\t%s" % (time.asctime(), line)
    line = ser.readline().strip()

Today is mostly cloudy with very occasional full sun so I'm losing charge at this point. I'll gather data for a while and prepare a longer term graph but here's the first hour or so.


An Arduino and a netbook running Linux is a very useful combination.

Only a little sun this morning and now mostly cloud through the day.  I used matplotlib to draw the voltage chart to a PNG image like this:


import matplotlib
matplotlib.use('Agg')


import matplotlib.pyplot as plt
import csv


INFILENAME = 'log.txt'
VOLTSCALE = 42.4186


datareader = csv.reader(open(INFILENAME,'r'), delimiter='\t')
points = []
for row in datareader:
    if len(row) > 1:
        volts = float(row[1]) / VOLTSCALE
        points.append(volts)


plt.plot(points)
plt.ylabel('Volts')
plt.show()
plt.savefig('voltgraph')


Here's how it looks:


With overcast skies the solar panel couldn't keep up with the 1.3A load and in the end I turned it off. I'm quite impressed with the Arduino for data logging and matplotlib for drawing graphs - much nicer than gnuplot which I've used in the past.

I'm informed that a good place to get solar panels (in Australia anyhow) is Rockby. They are certainly cheaper than retail stores and more reputable that some suspiciously cheap Ebay sellers.

Wednesday, August 31, 2011

A bit of TV punditry

This week I had an opportunity to join the collective commentating about what the resignation of Steve Jobs from the position of Apple CEO will mean. The interview went to air on Australia Network Newsline around Asia.


Normally I chat on radio so a bit of TV experience was interesting. Everyone looks good on radio. For TV, and particularly high definition, things like makeup and lighting are big topics. Cameras these days are remote controlled and the earpiece (I was interviewed remotely) is a tiny wireless thing you stick in your ear.

On Apple without Jobs? My view is that Apple will be fine for 3 - 5 years while the products currently in development make their way out the door, after that I'm worried that no-one will have the guts to say no to a product that isn't quite perfect.

If you'd like to see what I said, it will be in the Australia Network archive here titled "Jobs Loss". My thanks to the producer, makeup, floor manager, director and the host Jim Middleton for making the appearance easy for me.

Sunday, August 28, 2011

Blue Mountains Winterfest 2011

Just returned from a wonderful day at the Blue Mountains Amateur Radio Club's Winterfest.


A new venue this year, with more space, and it was fabulous. Lots of interesting new and second hand stuff.


Familiar faces from Dural were in attendance.


Some really great equipment in various states of working or not. I purchased some PCBs at reasonable rates.


Lots of fine discussions were had amongst the junk.


There was a working satellite station set up with steerable beams.


The Home Brew group had a small display table where I showed my "shambles" transceiver.


My thanks go out to the organisers of this event, all was very smooth and professional and the sausage sandwiches were very tasty.