The x86 version of Fldigi for macOS doesn't run on an Apple Silicon Mac. It's the first thing I've run in to that didn't work in emulation. Prompted by a tweet from @xssfox, who had done a native build but run into sound problems, I have also been able to build.
While the solar charge controller in the van has a volt meter in it, the display is very small and difficult to read from many angles. I've now added a much easier to read battery meter.
The meter itself came from this AliExpress listing. It was AU$5.81 and, as often happens these days, I spent more on the box and connectors than the electronics. It draws very little current and even the backlight turns off after settable time.
Four magnets with holes are bolted to the corners of the box and they work too well - the box comes apart before they let go of the van wall.
I took the easy path building the uSDX transceiver by ordering a board to build on but master home brewer, Stephen, VK2BLQ took the harder road and scratch built his. It is a thing of beauty (click to enlarge):
He has sent a report of his experience so far.
"The progress so far with the scratch built uSDX as most of the parts were in the parts box or already existing.
The computer doesn't have Paint, sorry no labels on the PCB but I think that you can see the components.
The chassis and front panel were for a project in the works and merely redirected to the uSDX so the pots are redundant unfortunately the large LCD has no back light.
You can see the micro-controller board that has little on it, just the chip, 20 MHz crystal and resistors.
The demodulator section uses the 74HC4053 created by Tasic YU1LM (DR3 series) and Miguel PY2OHH (#195). Since then, PY2OHH has incorporated this into his USDX Nano version.
It proves the concept, but has quite high conversion loss so would need a RF amplifier, the original FST3253 is much better and I wasn't going to waste the only one I had.
It seemed to me that the Class E output is used because of the hack of the original QCX and the higher efficiency so
perhaps even Class C would still work providing there is a tuned amplifier, linear amplifiers would work too, but defeats the purpose of the design.
I don't comprehend the magick that creates SSB from the 328P and the phase shifted CLK 2 of the SI5351, but it looks to be some sort of gate modulation of the three BS170 FETs. That extra FET I don't think actually worked properly anyway. You might see that there are only two FETs, as I blew up the other three, and the filter is a simple PI. Avoided is the tuned Class E and band pass filter as there wasn't enough room.
Building the demodulator board was little more than a direct conversion receiver and tested OK with a couple of signal generators and a CRO.
Your eyes are better than mine so I didn't modify the SI5351 board and just plugged it in, maybe for Morse it will be fast enough.
The first sketch used was 1.02 ver e loaded into a normal older Arduino Uno displayed signs of life on the 20x4 lcd. This meant the LCD would work, thereupon it was transferred to the receiver board. There were are couple of problems due to "Murphy's whiskers" and bad solder joints but did receive in a fashion. Fixing the faults and loading ver m was a vast improvement. The added functionality with the morse keyer and demod during sending and receiving is a real plus.
It may be a factor of the 74HC4053 and the Si5351 but there are a bunch of birdies ( is that a flock ) throughout 40 m, the FST3253 could be better. Then again, the UBITX V6 is no better.
The next version needs a bit of a rethink into layout. I would be interested if any really smart people can pare down the sketch to make it suitable for use by a 16 MHz Arduino Uno board, perhaps not SSB or elaborate display. The whole project is super clever and could be good for the current generation of homebrewers.
As you know, the project isn't over until the cabinetry is done, so it gets a wooden box, which got a bit warped before the glue dried and is out by a millimetre or two which is a pest. The spray on stain took a while to dry and dribbled a little, next time use a different stain.
Any way, that is my adventure with the uSDX,
73"
Great stuff Stephen, I am in awe of your home brewing skills and persistence.
Facebook might be useful for something. I noticed a post from Mark Jessop, VK5QI, to say that there was a High Altitude Balloon (HAB) heading towards Melbourne from near Adelaide so I thought I'd have a go at receiving the telemetry on 70cm with my vertical. The signal is on 434.199 Upper Side Band, 25mW.
The decode software was downloaded via here and I was happy to get a few decodes.
If you upload your position will show you on the map.
The balloon is about 230km from me and the signal is very weak but I do get decodes from time to time. Great stuff!
I have long admired the writing of Drew Diamond, VK3XU, and today I had the pleasure of meeting him and touring his excellent shack.
Drew has contributed many home construction articles to magazines over many decades but is probably most famous for his "Radio projects for the amateur" book series.
The project descriptions are accurate and thorough. I complimented Drew on the quality of his line drawing that is used to show construction. I asked him if he had been to art school and he seemed touched but said that, no, he'd looked to other technical drawings that he admired and had emulated the style. Drew also said that careful drawings give constructors confidence that the project has really been built as described and will work.
Drew is active daily on 160m and other ham bands and has a good set of antennas with low noise.
Note the small mic insert being used above. The shack is well stocked and shows a lot of home brew activity.
I took out the uSDX board to show and we discussed the descent of radio into the realm of computers.
My thanks to Nigel, VK3DZ, for setting this up. It was great to hear that Drew is a reader of this blog.
It seems like overkill to transmit QRPp WSPR on a rig capable of 100W so recently I purchased a WSPR Transmitter from Zachtek.
I went for the luxury option and got the Desktop model which is nicely boxed up and comes with a GPS antenna on a long cable.
The GPS antenna is sitting up at a window with a pretty poor view of the sky but it does get a lock as shown here in the Windows control software.
Today, I'm transmitting 200mW on 40m and doing fairly well on an end-fed antenna. These images are from the macOS version of WSPR Watch which is now native for Apple Silicon.
200mW into about 20m of coax and then an end fed - it's doing fairly well. I'm very happy with the ZachTek transmitter and recommend it.
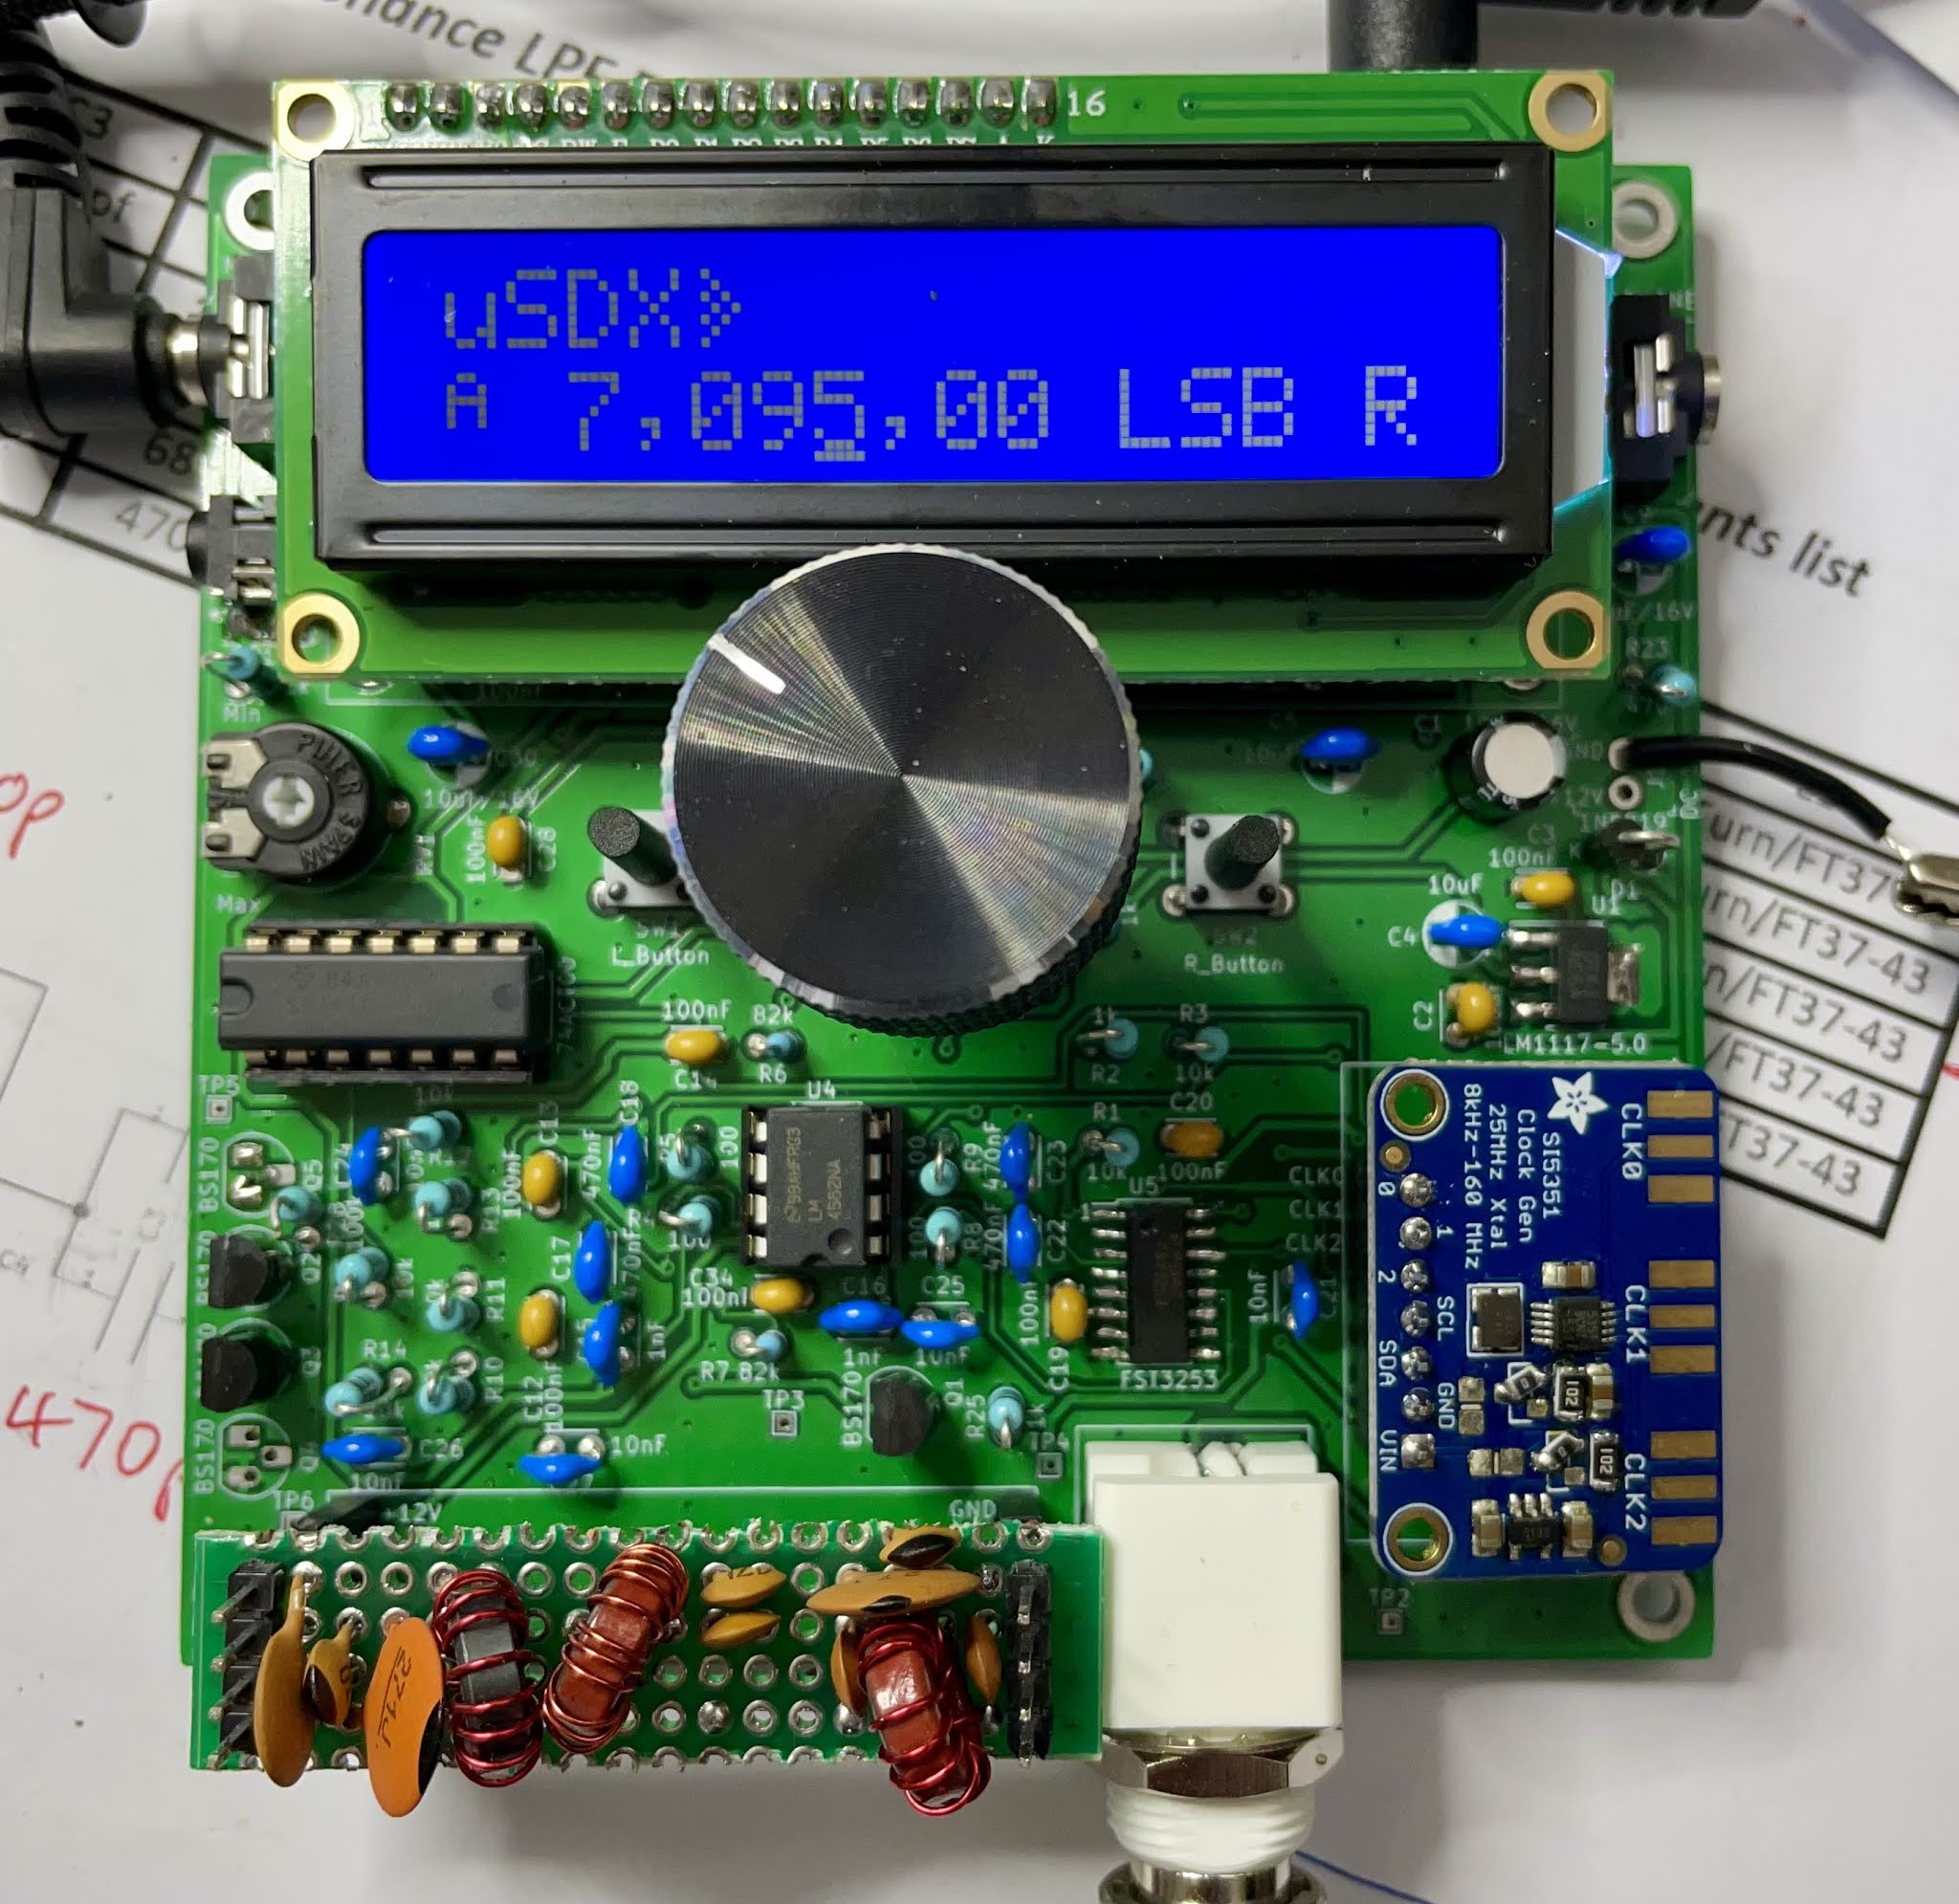
The uSDX is a fascinating new multi-mode transceiver design by Guido Ten Dolle PE1NNZ that uses an Atmel ATMega328P processor (normally seen in an Arduino) to do the digital signal processing for receive and transmit. The design comes out of an amazing hack of the QRP-LabsQCX CW transceiver.
The transmitter is a very efficient class E design and PWM modulation combined with amplitude modulation gives a passable single sideband signal. The circuit can cover many HF bands and there's a place to plug the appropriate low pass filter. (In the photo above I'm just receiving and have simply jumped the LPF).
While you can purchase a QCX and modify that, I've purchased a specially designed board.
There is a Wiki site about the project here. There is an active discussion group about the project on groups.io here. Within the files area is a downloadable Bill Of Materials (BOM) with the parts to build it. I was able to upload that CSV file to DigiKey and very quickly all the parts turned up. The only extra part needed was an Si5351 carrier board which I already had in the junk box.
I ordered the WB2CBA designed PCB from "too_brute" in the Netherlands via Ebay but it took ages to make it to Australia so you might check the discussion group for a source closer to your location. My board is the V1.02 revision.
Construction is fairly straightforward although you need to read about the earlier revisions of the board. There is one surface mount chip to solder to the main board. The most challenging part for me was the reworking of the Si5351 board. You have to remove some surface mount components and then add back two resisters and two zero ohm resistors as links. I used a hot air gun and needle nosed pliers to remove the components.
The software is here and can be built with the Arduino IDE.
Initially, I took the easy way out and programmed the CPU by writing the hex file to the chip which was plugged in to an Arduino UNO. I used a USBASP and the avrdude command line tool on macOS.
avrdude -c usbasp -p m328p -u -U R1.02j.hex
As you can see I've used R1.02j. One minor note is that my tuning knob goes backwards so I see there is a small change that can be made in the software to reverse it.
Now, building from the Arduino source, I commented out the QCX define and have reversed the ROT pins to read:
#define ROT_A 7 //PD6 (pin 12)
#define ROT_B 6 //PD7 (pin 13)
My uSDX didn't work on first power up... I had the power protection diode in backwards. Easy to diagnose and fix. Note that you need to adjust the display contrast otherwise you'll see nothing.
What an amazing age we live in. Guido has achieved amazing functionality in a low power CPU (slightly overclocked to 20MHz). Here's his block diagram of the hardware, and most of all, software taken from here.
(Click diagram to enlarge by the way).
Changes needed to make it work
My uSDX was working but turned out not to be on the right frequency. I'm using the Adafruit Si5351 board which is said to have a 25Mhz crystal on it, rather than the 27MHz one in the source code. Changing #define F_XTAL 25004000 still had me quite a lot lower than expected.
I measured the frequency on clock 0 of the Si5351 and instead of 7.xMHz it was 6.58Mhz.
I've now set F_XTAL to 24000000 and my frequency is close to correct. Here it is receiving a station on 40m with my terrible interference in the background.
Now I've added a rather rough low pass filter for 40m.
Transmit works but sounds terrible:
Looking around YouTube I found another user's off air recording. It's better than mine but still not great.
Update: Later software, where is "m"?
I noticed that people were talking about defines like SWAP_ROTARY that I don't see in the latest release software. The trick is to switch to the "feature-rx-improved" branch.
Update: Reset settings after changing defines in code
If all else fails, read the documentation. Even though I was changing the F_XTAL define in the source code it wasn't taking effect as I expected. It turns out that the Si5351 crystal frequency is stored in flash memory and can be displayed and adjusted in menu 8.1 where it's called "Ref freq".
At some point I had inadvertently set the frequency to 24Mhz and that value had been saved in non-volatile memory. The trick to reset stored settings is to push the rotary encoder in while powering on. The display tells you it is resetting all settings.
Update: Incorrect low pass filter!
I was probing around on the transmit side, where I get almost no power out, and have now realised that I've put the wrong sort of low pass filter on the little plug board. What is needed is a "serial resonance low pass filter". Here's a copy from that site:
Update: Decent power out now
After all the above, I was still only getting a few mW of power out. I removed a few of the BS170 FETs used in the class E output, thinking that I might have destroyed them, but they tested OK. I did break the leads on one of the FETs though.
I found this thread on the group about modifications to the WB2CBA V1.02 circuit to make it work with software revision m. Essentially:
Remove Q5 and short pins with solder blob.
Remove R28
Set menu item 8.2 to 20 and 8.3 to 205
This done and CW at the antenna looks like this with 2 FETS rather than 3:
34V peak to peak into 50 ohms, about 3W. Here's how me saying hello in sideband looks:
Here's how the audio is sounding:
Next step, as pointed out by John, VK2ASU, is to have a contact. I've been calling CQ a bit and can see and hear myself on a nearby SDR station. My signal is the one on 7.10. It looks a little wide but the suppression of the other sideband looks good.
I came up on the tail end of the popular Kandos net on 40m and as you'll hear had a good contact with Brenton, VK3CM who gave a very generous report for my 3W into an end fed antenna here. Brenton looks to be about 300km from me so I'm very happy with that.
Here's the uSDX's built-in morse decoder working rather nicely:
With the dawn of Apple Silicon, it's now possible to run the iOS version of WSPR Watch directly on a Mac. It works very well and looks pretty much the same as the macOS version I made with Catalyst. Here's the two side by side:
The native iOS version is the one on the left. For now, I'm leaving the Catalyst version in the App Store for people who haven't moved to Apple Silicon yet.
There have been a few bug fix releases recently. One issue was that the map stopped working on macOS Catalina, not because of something I did but because of a change in Xcode. If your map isn't showing, grab the latest version.
As a developer, I wanted to make sure that my software runs well on the new Apple Silicon so I ordered a MacBook Air with the M1 chip as soon as they were announced.
Overall, I'm extremely happy with the battery life and performance of Apple's CPUs, but as an early adopter of both the new Big Sur operating system and the new hardware, I have run in to a few issues which I want to share.
Migration Assistant
Out of the box I tried to use migration assistant to copy over the configuration from my existing MacBook Pro. Because my existing Mac is on macOS 11.0.1 and the new machine came with the slightly older macOS 11.0, Migration Assistant said it couldn't migrate until the machine was updated. Consequently I had to complete a clean setup and do the upgrade.
Upgrade stalled
The software upgrade from 11.0 to 11.0.1 stalled about three quarters of the way through the progress bar. I left it for several hours with the mouse pointing at the progress but there was no movement. I had to long press the TouchID power button to force a reboot. On restart it seemed to finish ok but I'm a little concerned that some part of the install might not have been completed.
I fared better than some who ended up with an un-bootable machine. Apple has a support note on how to recover from this situation by making a bootable recovery disk on another machine.
External Samsung T5 SSD problems
A Samsung T5 SSD which works perfectly on other machines fails to mount or work reliably on the Air M1. I'm not alone in finding this. Heavier USB-C cables seem to help and upgrading the drive's firmware has improved, but not totally fixed the issue.
The Samsung software is terrible by the way. There is a theory that the M1 Macs are not providing enough power for some external drives but older, larger, drives are working for me so I'm not convinced that's the root cause.
Good things
The initial tasks to be done on a fresh macOS install sometimes bring a machine to its knees for a day or two. Spotlight indexing, iCloud syncing, photo analysis and (in my case), installing Xcode, are all heavy tasks. The M1 Air handled all this and stayed cool while sipping battery.
The keyboard is a big improvement over the one in my current MacBook Pro which has one of the much maligned low profile keyboards.
TouchID on a Mac is a new experience for me and is wonderful. I wish they'd do FaceID.
This MacBook Air is Apple's entry level machine and it out performs most of the current Intel based range. 24 hours in, the 8 CPU cores are mostly idle.
I can't wait to see what they do with the higher end machines.
We moved to Victoria (Australia) just as COVID was ramping up and this state has had quite a strict and lengthy lockdown which has worked. After being limited to travel within just 5km of home, that was lifted to 25km and now the state is open. I took up a kind offer from old friend Richard who has recently purchased a property in Drummond. Naturally, being a considerate guest, I slept in the van.
The van has been parked under cover for some time and a few days ago I discovered that, despite taking it for a weekly drive, the deep cycle "house" battery was very flat. It was showing 3V and at that low voltage the relay which connects it to the alternator had, correctly, declined to do that. I should have noticed.
Something must have been draining the battery slowly even though everything was off. Happily after a slow charge it doesn't seem to be too damaged.
It was sunny both days and the battery quickly charged and was able to run the fridge over night without any trouble.
I have read that connecting the house battery suddenly to the car's alternator isn't as gentle on it as being charged from solar through a charge controller so for now I'm parking it in a sunny spot and have disconnected the alternator relay.
Speaking of solar.. Richard's place is completely off grid and has an impressive solar system built over many years back to a time when panels were so expensive that it made sense to have them steered to follow the sun.
The house is wired for 48V, although it's hard to find lights for this voltage. There is an inverter to provide 240V AC as well. The fridge is gas though.
We hung out a dipole for 40m and had a tune around. Very low noise location, just the ticking of my charge controller. We heard VK7, VK4 and a bit of VK2.
HF noise is an increasing problem that plagues hams in the suburbs. Switching power supplies, solar inverters and plasma TVs are all culprits.
Here I'm plagued by occasional bad interference on 40m (but really all over HF) that I think comes from a switch mode power supply used by a neighbour. I've just built the antenna noise canceller by Terry, VK5TM and it seems to work very well.
Noise cancellers work by taking a sample of the noise, inverting the phase, matching the level with the signal and mixing them - thus cancelling the noise but leaving the signal. Here's another example where I switch it in and out:
Here's the part of the circuit that controls the phase of the noise signal that is then amplified and mixed with the main antenna signal:
I bought the board and kit of parts (AU$55) and it is a very professional package. The parts are well presented and I found none missing.
The board is excellent quality.
The kit went together smoothly following Terry's instructions. The only fault was mine, when powered up the relays didn't click even though the transmit LED came on - I had missed a solder joint on one of the coils.
I purchased a metal box from Jaycar, part HB5442, 120x61x102mm and the project fits well with plenty of room for wiring.
To effectively cancel noise you need a sense antenna that picks up the noise but not the signal. In my case I'm using a 20m dipole on the fence line as the sense antenna and an end fed for 40m for the signal. I think that having a sense antenna that doesn't pick up the band I'm wanting to receive might be a reason why it's working so well for me.
In my case the noise level on the sense antenna is very high and I have to set the gain control almost at the bottom of the range. I might try installing a smaller sense antenna on the fence specifically to pick up the neighbour's interference. The two phase controls are quite sharp and together can be used to null the noise very well. Signal strength is reduced but can be boosted with a pre-amp, the main thing is that the signal to noise ratio is greatly improved.
I was tempted to buy the MFJ-1026 for US$239.95 + shipping, but Terry's kit works well and if you can do a little soldering I recommend it.
Note that antenna noise cancellers do not work in all conditions. The best scenario is where there is a single source of noise that can be picked up close to the source. I understand that broadband noise may not be able to be cancelled but in my case the broadband noise I see between the switching supply bands are cancelled nicely.
Update: I'm having doubts
I've been playing with noise antennas and I'm starting to doubt that this is working properly. I think I get some noise cancellation but it's only when the main antenna gain is fully reduced. Bear with me while I experiment further.
Update 2: All good
It's all about the noise sense antenna. Originally I used a 20m dipole but the noise level was extremely high. Next I tried a short vertical connected via a balun - that's when things got weird. Finally I've simply clipped a meter or so of wire to the centre of the coax and the controls on the noise canceller work as expected.
Noise is reduced by playing with gain and the two phase controls.
In the new shack I've been soldering on a cutting mat but it turns out this is not a good surface as it quickly melts if a hot component is rested on it. I've now purchased a low cost silicon baking mat and this works well. It's a strangely sticky material and is quite thin but it does not complain about melted solder being placed directly on the surface.
This one was purchased from Amazon Australia and cost AU$8.95 (but I notice that the price seems to vary). There are purpose made soldering mats around but they cost at least double this.
Having used it a bit now, it works well but the slightly sticky surface makes it a bit hard to pick up small components and snipped wires.