Friday, July 29, 2022

New open source SDR available from HFSignals - sBitx

I've been following the progress of an open source SDR transceiver, the T41-EP, from Albert Peter and Jack Purdum for some time. It's a great contribution but the author's understanding of how open source normally works is a little unusual.

By contrast, Ashhar Farhan, VU2ESE, of HFSignals, exemplifies best practice. 

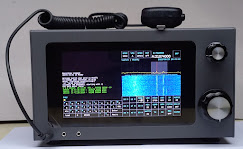
HFSignals new SDR transceiver, the sBitx, is available to early adopters. The radio has a large graphical touch screen that shows a waterfall. Inside there is a standard Raspberry Pi which is set up as the software development environment - great idea!

Here's my video of unboxing the sBitx, tuning around and having a not great first contact.


Later, on a different (more resonant) antenna, I did not have RF feedback trouble. It might be that the SWR is quite critical. The operation manual says "At times, with high enough gain and high SWR, RF can get into the mic and cause self-oscillations. Monitor the modulation on the display if you are setting the mic above 50 to be sure that it doesn’t happen."

"The sBitx is a 40 watts, fully open source, high performance HF SDR transceiver with in-built popular modes like the FT8, RTTY, PSK31, etc."

Design paper.

The source code and circuit diagrams are here on GitHub.

Operating manual.

Assembly manual.


There is discussion about the sBitx in the Bitx20 group (which should probably be re-named).

Having a computer inside that can be internet connected opens up all sorts of interesting possibilities for this platform.

Update

Since the original unboxing video, where audio stopped, I have updated the software to 1.1 and that problem hasn't re-occurred.

On the RF feedback... I was using my off centre fed dipole. Reading the ARRL Handbook I saw that command mode suppression on the feed line is "essential". This has now been added. I guess my normal (commercial) radio is more forgiving.
Wednesday, July 27, 2022

QDX with Fldigi on Ubuntu 22.04

The QDX works brilliantly with WSJT-X but I have struggled to get it working with Fldigi on Linux.

I'm pleased to report that I just had an Olivia 8/250 contact over a distance of 732km with VK2BLQ using Fldigi on Ubuntu 22.04.

Thanks to KJ7LVZ for the tip to install Pulse Audio Volume Control (from the Ubuntu App Store). That let me adjust and monitor send and receive audio levels.

In Fldigi I set the audio devices both to "pulse".

In the QDX settings I set the audio cycles to 1 (down from 480) as suggested by G3SPL. The larger number of samples is fine for slow changing modes like WSPR or FT8 but not good for fast modes like Olivia. Also I increased the receive gain to 75, up from 60 (I think), so I could see something on the waterfall in Fldigi.


Here's the Pulse Audio Volume Control window:


While I'm here, I've been using `screen /dev/ttyACM0` to configure the QDX but it's difficult to send ^Q as that's used for XON/XOFF. The trick is to type ^AQ. Hans, it might be good if there was another key to exit a menu than ^Q as I think many serial terminals might use ^Q for flow control.

Friday, July 22, 2022

Updated QDX Firmware to 1.04 - working very well on WSPR

The QDX is a tiny FSK mode transceiver from QRP Labs which works amazingly well. This week, new firmware was released which improves transmit a little. I've been running it on 40m here and results are very good.

My friend Stephen, VK2BLQ, is 800km away in Sydney and he received my 3W at +18dB last evening.

I have a theory that direct generation of RF for digital modes in rigs like the QDX produces a cleaner signal than you get by mixing audio up to RF in a sideband radio and so decodes are better.

At a similar time I had a transmit cycle that was spotted by 45 stations around the world.


 Changes in 1.04:

  • Resolution to the Rev3 PCB "popping" issue (RF discontinuities during TX).
  • Audio streamed to the PC during Transmit is now set to zero (silence).
  • 50 millisecond transmit timeout on cessation of audio from PC (protects QDX e.g. if PC crashes).
  • No CAT command TX timeout (configurable enable and timeout duration).
  • Removed unnecessary 48ksps clock domain sync PC vs QDX.
  • Enables PTT output connector, with grounded and +5V outputs individually controllable by band.
  • 12kHz IF offset is removed when you enable IQ Mode.
  • Transmit is disabled when you are in IQ mode. 
  • Gain is now in dB.
  • Gain is now configurable per band.
  • New "Band Configuration" screen where you can configure the list of supported bands.

The firmware upgrade process couldn't be easier. You interrupt the power up cycle and then re-plug the device. It mounts as a disk drive and you drag over the firmware.

After running for a few days on 40m I see I'm #3 on the WSPR Challenge for receiving. 


Hard to beat Phil, VK7JJ though!

Thursday, July 07, 2022

Live PV solar monitor

If you have solar photo voltaic panels it's good to know how much is being generated so you can choose when to use power such as the tumble dryer. Using power locally, from the panels, is much more economical than receiving the feed-in tariff and buying power back at other times.

In a previous home we installed a PV solar system that had a Fronius inverter. I was impressed with the low RF noise emitted by this product and pleased to find that it had a JSON producing web service endpoint that I could poll to see how much power was being generated.

At our new home there is a system with micro-inverters and an Envoy controller. The micro-inverters do produce noticeable RF noise but bear in mind that this is a very low noise location so I might be a little sensitive to it.

It turns out that this system also has JSON producing web services. The system, once I figured out how to connect to our Wifi, has a web interface at http://envoy.local 

By enabling Developer mode in the browser I was able to see that the web page calls back to endpoints including:

  • home.json
  • production.json
  • Inventory.json
  • info.xml
  • dba.json
I haven't explored them all, but production.json gives me the data I need.

Here's a snippet showing how I get the generated power and the used power from the content returned from production.json

DynamicJsonDocument doc(3072);
DeserializationError error = deserializeJson(doc, payload);

if (error) {
USE_SERIAL.printf("Json error");
return;

}

// Extract current power generated from the Envoy controller JSON

long genWattsNow = doc["production"][1]["wNow"];
long useWattsNow = doc["consumption"][0]["wNow"];

Using a nifty M5StickC device, which has an ESP32 and a little LCD display, I've stuck together sample code for an http client and Json parser to display the currently generated power and the currently used power. I'm happy to share the code but honestly, there's not much to it beyond the HTTP sample code.