Thursday, January 28, 2021

Raspberry Pi Pico

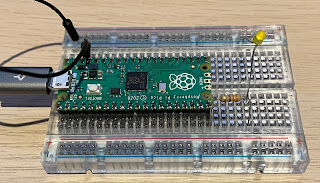
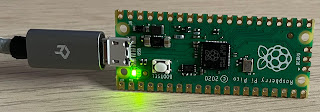
As soon as I heard about the Pico I placed an order. These boards are more like an Arduino than a (linux capable) Raspberry Pi. Like the blue and black pill, they are much more powerful than most Arduino and have a dual core Arm chip.

Hackaday has done an excellent job of describing the new chip and this board in their writeup.


While you can program in C++, I'm tinkering with the MicroPython environment. To get started, you download Thonny and run it. Hold down the button on the board and plug it in to the computer with USB. Thonny will see it and offer to install MicroPython. Next, the board reboots and when it comes back there's some sort of serial protocol running between Thonny and the board. 

Here is the blink example.

I find that sometimes I get a device busy message and must click the stop button and then the run button again.

Hardware access is via a module called machine. This provides a well organised set of interfaces to things like threads running on the other core, interrupts, low power sleeping, timers and serial interfaces including I2C and SPI.


After playing with the Python environment, I've gone ahead and installed the C++ tools by following the instructions on Ubuntu Linux. All went smoothly for me but I do miss the huge number of libraries that exist in the Arduino world - good news is that a port of the Arduino core is on the way.

It's a bit fiddly having to plug in the USB cable while holding the BOOTSEL button down and so I've ordered a little USB hub with port switches on it.

A couple of improvements for a future version - please use a USB-C connector rather than the flimsy micro USB socket, also it would be handy to have the pin markings on the top of the board rather than the bottom.  
Tuesday, January 26, 2021

Simple QRP end fed antenna tuner - take 2

I've had another shot at the simple end fed half wave tuner and it's even better than yesterday's effort. The 12 way switch selects the input tap on the toroid and the wiring is quite neat as the toroid sits right on the back of the switch.

Here's the very simple circuit.


There are three turns on the earth end of the toroid, then twelve turns with a tap going out to the switch on each turn. There are three more turns at the hot end of the toroid. In use I find that the single turn selection is a bit too fine but it does seem to tune quite widely on bands over 40m with just a short wire over the clothes line.

Again I've used a $1 box from Woolworths and I plan to use more of these boxes in the future.


Being my second attempt I positioned the terminals better so that they didn't hit the internal components or the lid clips. Here it is nicely nulling the SWR.


I couldn't quite tune my short wire to 40m so I've had another go at the tapped toroid and this time it's 3 turns from ground, and then two turns between each of the switched taps.


This gives more range. I think at the low end it should be one turn and more between higher taps would work.

Ross, VK1UN, thinks I should try an air wound version and made this prototype:


Very nice!

Sunday, January 24, 2021

Simple end fed tuner to fit in a cheap project box

In the supermarket the other day I spotted these little boxes, three for $3. I thought they'd be good little project boxes for something so, that was the trigger for this.

I've been watching videos from Charlie Morris, ZL2CTM, recently - he's really doing a wonderful job. One of his projects is an End Fed Half Wave Antenna tuner with SWR meter

My portable radios have built-in SWR meters and I figure it's better to tune for a minimum with the meter in the radio than one in the tuner - that also made the project simpler.

I didn't have the T68-6 toroid, just a smaller T20-6, in the junk box. I grabbed a 12 position switch from Jaycar and a 270pF polyvaricon (variable capacitor). Here's the very simple circuit.


I think there might be an elegant way to mount the toroid on the back of the 12 way switch with the windings looping around each of the terminals but I'm not quite there with this initial build.


Here's a close up.


In the back yard there is an end fed wire that rises up to the top of a 6m squid pole and then angles over to a pole on the roof of the garage. I guess it's about 12m of wire. A counterpoise runs along the ground under the back deck.

The box worked well for a project like this, it was easy to drill but strong enough to hold things like the switch without flexing.


The tuner worked well on 20m with a deep dip in SWR but a little more inductance (more turns) is needed for 40m.

Update

As mentioned, I'm working on a neater wiring system for the switched toroid. This is looking better:


Friday, January 22, 2021

Visited the old Radio Australia shortwave site at Shepparton (by train)

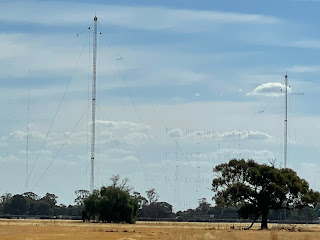
Although I worked for the ABC and even Radio Australia I never made it out to the transmission site at Shepparton Victoria until this week. The site has been sold, we think to property developers as there are housing estates in the area, but the antennas are still up and look magnificent. 

Dallas, VK3EB, took me on a tour around the perimeter fence. The main building is still standing.


There are multiple antennas on the site targeting different regions including Japan and the USA. There are large arrays of phased dipoles with a rear reflector.


It's hard to capture the antenna wiring in photographs against the sky.


Here's a plan of one of the instances of what we're looking at.


It was a fantastic site and it's such a pity the antennas aren't available as a receiving site or something.

Transport

I travelled from Melbourne to Shepparton on the train. Nigel suggested I invest in a First Class ticket as "there's less vomit". 


Lots of lovely country stations to see along the way.


On the way the train became "defective" due to the radio not working so we switched to a bus for the final leg.


It's a very comfortable service and not well patronised.


My thanks to Dallas for his hospitality and the tour. We also visited some local hams who were very welcoming and interesting.

WSPR Watch app mentioned in QST

In the last few days I've had a surprising number of nice emails about my iOS App, WSPR Watch. One of the writers mentioned that they'd heard about it via QST, which was news to me.

I subscribe to QST but didn't realise that the February edition was out. I downloaded.. and there it is.

Steve Ford, WB8IMY, tells me that he uses the app on both a phone and tablet.

I feel honoured to get a mention in QST. Thanks Steve!

Tuesday, January 19, 2021

HF noise at my home

Since moving to our smaller home in Thornbury I've been observing the noise on HF. It varies widely. Sometimes, 40m has broadband S9 noise.

At other times it's pretty good.

Sometimes the noise appears to be from a switching power supply (and this pattern is repeated all across HF!)


20m can be pretty good at times.


Yesterday I had a good voice contact with Ray, VK2ELO. One thing that stands out is, what I presume to be, over the horizon radar. Normally pretty narrow but this one sweeps more than 250kHz.

The noise canceller I built can work on the switching noise but can't help with broadband noise. Sometimes the most practical way to do ham radio from a suburban home is to transmit locally and receive via a near by WebSDR.

Sunday, January 10, 2021

Be careful of prices for ham radio gear on eBay

Searching for an end fed half wave antenna tuner kit on eBay I came across this amazingly over priced product:

Amazing but the reviews are all good (or fake). They've sold 665 of these so that's a pretty good business. What appears to be exactly the same product is advertised for much less if you scroll around.

Peter, VK3YE, has a recent video on the topic of second hand ham radio gear purchasing.

Peter makes some excellent points. You don't always get what you pay for, particularly as technology marches on.


Saturday, January 09, 2021

Elecraft MH3 Microphone cord frays

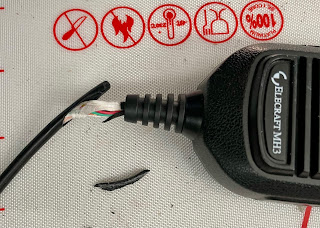
I like the Elecraft KX3 very much but unfortunately the MH3 microphone cord has spontaneously frayed for me. Looking around the internet I can see that I'm not alone.


The repair isn't impossible but it is rather fiddly. I wasn't able to re-use the strain relief and have replaced it with shrink wrap. Here's the colours of the wires for future reference.


I hope Elecraft can choose a different cord in the future so this doesn't happen.

Stephen, VK2BLQ, sent me this picture of a Chinese manufactured mic that came with a CRKits radio. It looks the same and has the same fraying. Perhaps Elecraft gets their mics from the same source?


Monday, January 04, 2021

Apple Silicon Fldigi but no sound yet

The x86 version of Fldigi for macOS doesn't run on an Apple Silicon Mac. It's the first thing I've run in to that didn't work in emulation. Prompted by a tweet from @xssfox, who had done a native build but run into sound problems, I have also been able to build. 


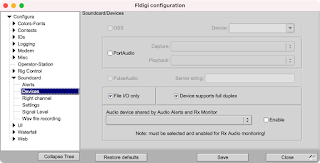
Looks good but when I try to select PortAudio...

I see this in standard out:

||PaMacCore (AUHAL)|| AUHAL component not found.||PaMacCore (AUHAL)|| OpenStream @ 8000 returned: -9999: Unanticipated host error

Here's how I got it to build

Xcode is installed. Homebrew is installed.

brew install automake

brew install libsamplerate

brew install portaudio

brew install fltk

brew install libsndfile # I already had this

brew install hamlet

brew install xmlrpc-c

brew install pkg-config

brew install zlib

brew install lzlib

brew install libpng

brew install --build-from-source portaudio libsamplerate hamlib libpng fftw

export CPPFLAGS='-I/opt/homebrew/include/'

export PKG_CONFIG_PATH=/opt/homebrew/Cellar/zlib/1.2.11/lib/pkgconfig

export LDFLAGS='-L/opt/homebrew/lib'

mkdir ~/Developer

cd ~/Developer

# get the source code whichever way you prefer

cd fldigi-fldigi

autoreconf

automake --add-missing

./configure

make

./src/fldigi # to run!

It looks like this is an issue with PortAudio on macOS 11 when built against the macOS 11 SDK. "PA/CoreAudio uses some "deprecated" APIs which fail on Mac OS 11.0 #218".

This issue in PortAudio that deals with the issue.

Saturday, January 02, 2021

House battery meter for the van

While the solar charge controller in the van has a volt meter in it, the display is very small and difficult to read from many angles. I've now added a much easier to read battery meter.


The meter itself came from this AliExpress listing. It was AU$5.81 and, as often happens these days, I spent more on the box and connectors than the electronics. It draws very little current and even the backlight turns off after settable time.

Four magnets with holes are bolted to the corners of the box and they work too well - the box comes apart before they let go of the van wall.