Friday, July 27, 2018

Built a QCX 20m kit

Inspired by the fascinating talk by Hans Summers I mentioned recently, I ordered a QCX transceiver kit with filter for 20m. Hans criticised the continued use of the obsolete NE602 based QRP transceiver design in the light of more modern and better performing quadrature detectors based on clever programming of the Si5351 clock generator.

QRP Labs, Hans' company has published an excellent paper that accompanies that talk. For US$49 you get amazing value.

The quadrature sampling detector is shown here (reproduced from the paper which is well worth a thorough read). Here's the full circuit.


The board has the surface mount ICs already soldered as you see above and the components are neatly bagged up.


My kit was missing the plastic screws which is no big deal.

My board was revision 4 and unfortunately the assembly manual hasn't been updated yet. The instructions are very clear and detailed. I mis-installed a few resistors, completely my fault, but easy to do. Colour codes are hard to read sometimes.

The most challenging part of the build is the T1 Toroid transformer with 4 windings but Hans has included a diagram from a third party that makes it quite clear.


The software is fantastic with a menu driven system that includes built-in alignment circuitry that is magical! With no antenna connected, test signals are generated and measured with multi-range bar graphs so that the front end band pass filter can be peaked, I-Q balanced, and 90-degree phase shift can be adjusted for high and low frequencies. (Note that these last three interact so you have to rock between them to optimise).

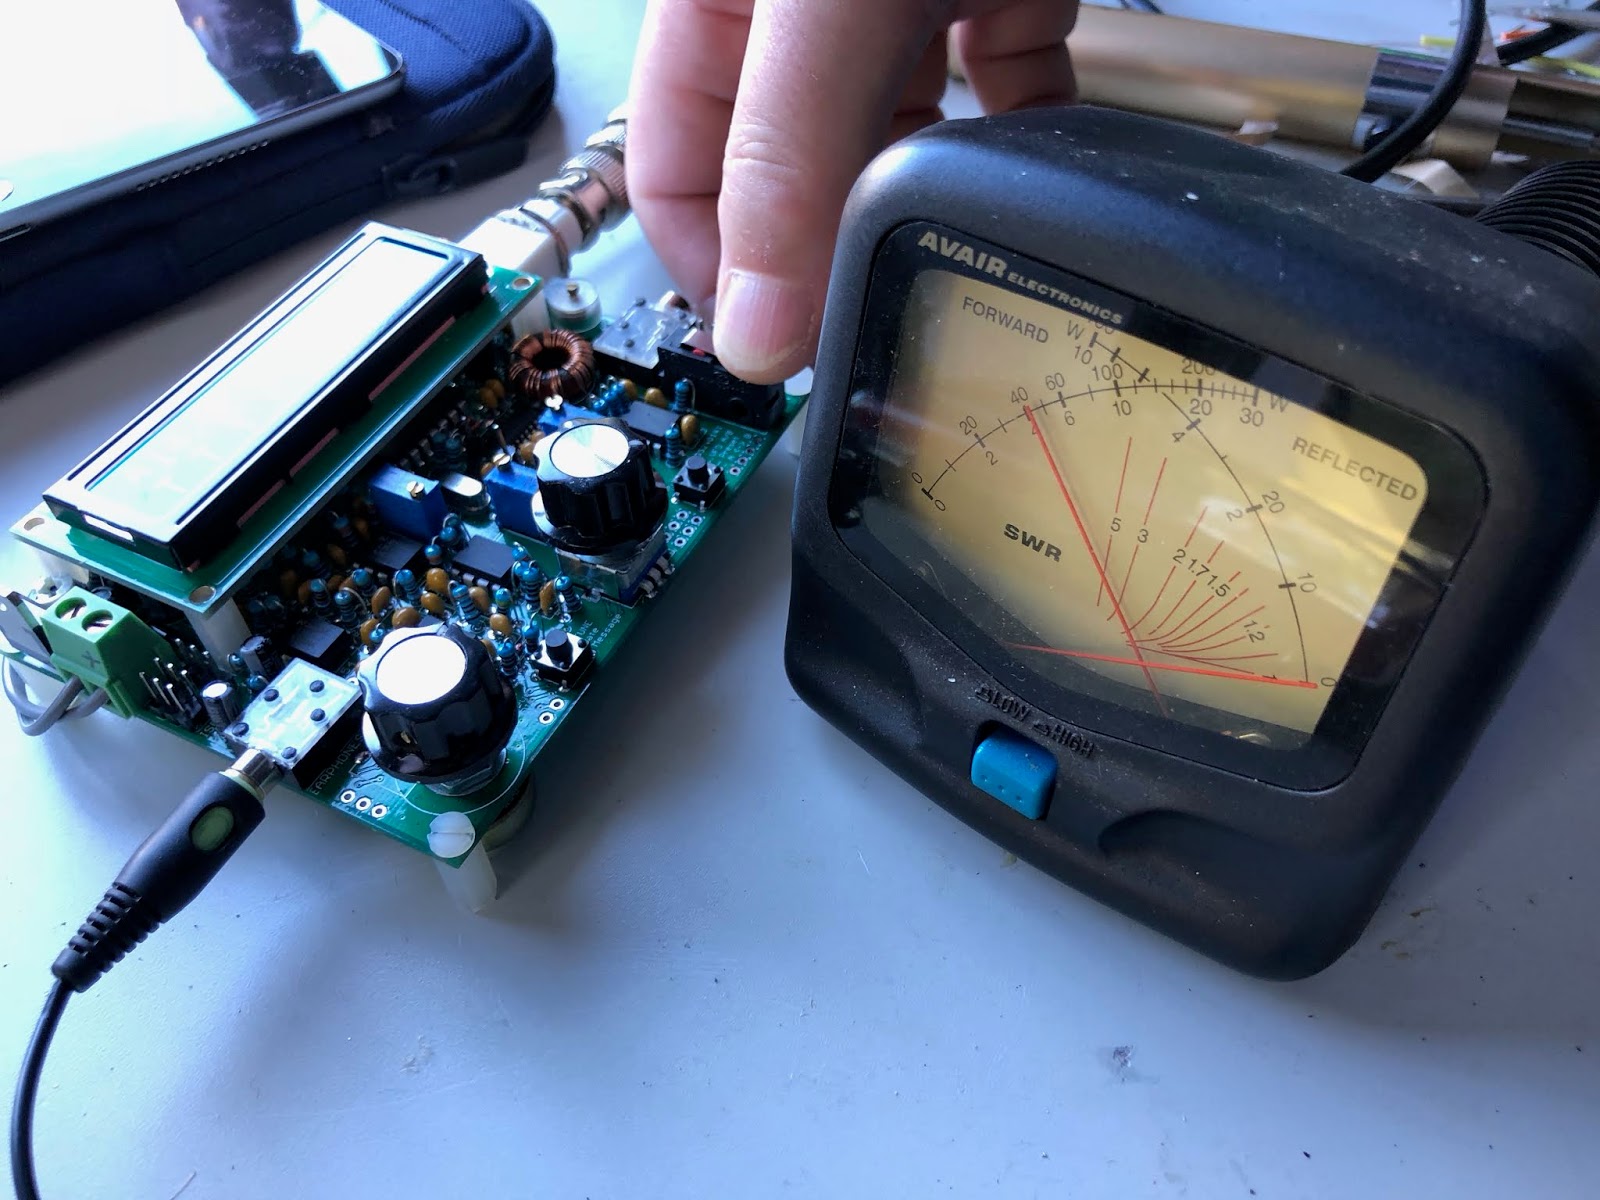
I'm getting about 4W out on 20m with a 13.8V supply.


The RF out stage is three BS170 FETs running in class E and it's amazing to see a few small transistors producing this power without excessive heating.

I enjoyed building this kit, it's great value, but care is needed as it's quite difficult to remove components from the dense board.

Today was the ARNSW home brew group meeting. I passed the QCX around along with the circuit diagram which attracted quite a bit of interest.


Tuning around 20m this afternoon I found the CW decoder works amazingly well. This is a 200Hz bandwidth CW receiver but I'm able to listen to SSB, although it's rather too narrow. I hope QRP-Labs does go on to make an SSB unit based on a similar design.

Thursday, July 19, 2018

A visit to the home of FreeDV and codec2

Arriving in Adelaide after the spectacular Great Ocean Road, David, VK5DGR, was kind enough to invite me to stay with him. I knew I was in the right place when the squid pole supporting a corner dipole came in to view.


I was very keen to see where the "magic" happens concerning the development of the world class low bit rate voice codec2 and FreeDV. While David insists that much of it is done on a couch with an old ThinkPad he does have a nice bedroom setup with some test gear.


Two members of the influential Amateur Radio Experimenters group, Mark, VK5QI and Matt, VK5ZM came for dinner and we had an entertaining chat about balloon telemetry and tracking. Mark brought along one of the radio transmitters harvested from those launched by the BOM.


These folks are known internationally for their work launching balloons and tracking them. It was great to meet. David, has contributed an improvement to the radio modem software that is used to transmit telemetry.

At the moment, David is working on a new mode called 2200 for FreeDV with better quality (and a higher bit rate than 700D) and I was pressed into service doing a field test where we left a test transmission running and drove several kilometres away to receive off air and measure real world errors. We met up with Peter, VK5APR at the park. I haven't seen an Alexloop up close before and was impressed with how well it worked.


The tests went well and it was interesting to see how the spectrum looked flatter on my KX3 than it did on an FT817 (where is slopes down to the right).


David has a much better and more technical blog post on the development and field testing.

Vanlife on the Great Ocean Road

The main attraction of my current trip has been the drive along the Great Ocean Road from about Geelong over towards Adelaide.


The road is spectacular with lovely spots to stop and walk to see views like the one above. There are lots of tourists and apparently they need to be reminded of the road rules quite often.


The van is running well again but I heard a strange clunking sound which I thought was something falling in the back but turned out to be the right front indicator.


I have repaired this with duct tape but will get it fixed on my return. I can see it's been glued up by past owners.


Van tour of ham shacks

In my current van expedition I've been dropping in to a few ham radio friends. On my way south I visited Peter, VK3RV, who I met on the Sunday FreeDV callback. He has a terrific signal from his QTH in Sunbury in to my location in Sydney. He's on a property and has a nice HF antenna setup.


While there we had a contact with New Zealand using the amazing FreeDV 700D mode.


Thanks Peter for the hospitality and fascinating chat.

Monday, July 09, 2018

Van broke down

It's an old van and so far I've replaced the differential, rear bearings, battery and tyres. Yesterday I was rather lost on muddy logging roads with no mobile reception and I noticed that sometimes the van didn't start first time when I turned the key.

Today I stopped at BCF just out of Wagga Wagga and when I turned the key... nothing.


Because it's an old van I decided to join the NRMA and today I took advantage of that with their roadside assist service.


In these Hiace vans the engine is under the passenger seat. The technician seemed ready for a battery replacement but my volt meter showed me that the battery was fine. The starter motor is underneath and a rap with a hammer and it worked! The guy explained that this is a common short term fix but in the end the problem will re-occur.

I've had the starter motor replaced for $380 (with member discount) and I'm pretty happy with that. They fixed it same day but I'm staying over in a motel. Hitting the road again in the morning.

I feel very fortunate to have broken down in a town rather than up a muddy, rarely used track, with no mobile reception. A close call.

A toilet for the van

I must admit I've been hesitant about this, but touring around in a camper van wondering anxiously about where the next toilet will be found was distracting me.

As mentioned in a previous post, I've been peeing in a bottle to avoid going outside in the middle of the night. Before heading off on the current adventure, I bit the bullet and purchased a small chemical toilet for about $160.

Also purchased was the recommended flush water additive, collection chamber additive and special toilet paper that breaks down fast. I'm advised by camping expert Tim Bowden that the flush additive isn't required and that Napisan can be used in the sewerage chamber.

Currently I'm camping alone so have no qualms about using the thing in the van with the curtains drawn and door locked, not sure how I'll go with my wife on board. Some people use a popup lightweight tent to make a separate outdoor toilet.

It's great to be able to camp at free sites with no facilities such as this spot near Gundagai near the river.


While my ultimate plan is to avoid using the ensuite if possible I was kind of keen to try it just to see how the process works and how nasty it might get. After a few days, and depositing of both number 1 and 2, I looked on the WikiCamps app for the nearest "dump point".


Dump points are fairly common it turns out. Under the lid there's a giant funnel. Next to it is a tap and hose. I wore rubber gloves but found the dumping of the cassette pretty easy and clean. The additive chemical seems to be a strong perfume so there were no unfortunate smells.

After dumping I filled the cassette with water and shook it, then rinsed it out. I did this twice and all seemed reasonably clean.

We forget the magic that city sewerage systems perform. Camping out, using drop or chemical toilets is a reminder of the reality of all this.

VK1UN's nifty FL2K filters

Ross, VK1UN, has built a nifty interface from the FL2K VGA dongle to some low pass filters for transmitting WSPR, he writes:

I’ve gone ahead and put together what I have in mind for the VGA cable with R/G/B out.

I was thinking that, if I am running output to Banana terminals for wire antennas, I would just design 75 Ohm filters to hard connect inside the little Aluminium box between the 3 RCA socket block and Bananas. See the first pic. It is going ahead smoothly despite requiring quite a bit of accurate hole drilling and hole matching with the 3 RCA socket board.I think it will be very neat.

Secondly, I have designed three Constant K 750 Ohm filters that are dual band:

60m & 40m, 30m & 20m and 17m & 12m. Whilst I have not built these all yet, I have modelled them on LTSpice and they look to have very suitable performance and all are using standard component values or a minimum combination thereof.

Here's the box showing how the VGA connector to RCA lead is used.


 30m and 20m LPF
75 Ohm, 17 and 12m
75 Ohm 60 and 40m

I’m stopping at 12m now as I am not sure of the wave from a 17m or 12m Weaver generation, but the multiples of 48K, QRG and Sample rate seem to be close.

You can contact Ross at any of the following callsigns @amsat.org: VK1UN, VK8UN, 6O0O, T61AA, EX1UN.

Thursday, July 05, 2018

VK1UN's VGA dongle WSPR spotted in two states

Ross, VK1UN, based in Victoria has been generating WSPR RF using the Weaver method in GNURadio and transmitting with an FL2K VGA dongle acting as a D/A. Naturally, he's using a nifty low pass filter and antenna tuner.


On 40m over night here I spotted him in New South Wales and he was also spotted in Tasmania.


Not bad for an $8 transmitter into a G5RV on a city block.

Wednesday, July 04, 2018

QRP Low pass filters with surface mount on veroboard

Ross, VK1UN, has been experimenting with generating WSPR RF using the FL2K VGA dongle. The waveform is pretty rough and of course a low pass filter is required. His solution is mechanically very neat I think. Here's a 160m low pass filter.


The design and simulation of the 160m filter. Capacitors used were 2200 plus 220 = 2420 and in the T 2200 plus 100 = 2300.


He builds on veroboard and uses PCB mount SMA connectors at each end. The tracks are cut under the surface mount inductors. Very neat.


In the end these get boxed up. Ross has modified fl2k_file to use any of the three colour outputs so he can transmit on three different bands.


Nice work!

Installing wsjt-x on Ubuntu 1804

A note for future me. Installing the latest wsjt-x on the latest Ubuntu fails. (The version in the software catalog is very old). Here's the tricks. The main issue is that the wsjt-x deb is built against libreadline6 which is no longer available. libreadline7 is there but you need to tell dpkg to ignore the request for 6.

Download wsjtx_1.9.1_amd64.deb from https://physics.princeton.edu/pulsar/k1jt/wsjtx.html

If you previously tried to install wsjtx from the deb file you'll need to tidy up with:
sudo apt --fix-broken install

sudo apt install libqt5multimedia5-plugins libgfortran3 libqt5multimedia5 libqt5serialport5

sudo dpkg --ignore-depends=libreadline6 -i wsjtx_1.9.1_amd64.deb

Update: There's instructions on how to install libreadline6 on linuxer.eu here.