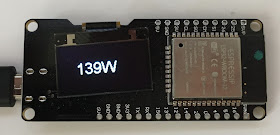
Since then, I've moved on to marvellous little boards that combine an ESP32 with an OLED display.
(Yes, I'm rushing to finish this before the sun goes down).
The Fronius inverter joins the home wifi network and has a simple web service endpoint that returns JSON data.
To compile this you'll need:
- ESP32 Arduino board code
- ESP32 OLED library
- ArduinoJson Library (in the Library manager)
Settings in the Arduino IDE are:
Documentation is a bit of a puzzle and some of the examples are wrong for this board. The magic I needed to talk to the display on this board is:
- Board: WEMOS LOLIN32
- Upload speed: 921600
- CPU Frequency: 240MHz (WiFi/BT)
- Flash Frequency: 80MHz
- Partition Scheme: "Default"
- Port: "/dev/cu.SLAB_USBtoUART" (Note that I'm on macOS)
Documentation is a bit of a puzzle and some of the examples are wrong for this board. The magic I needed to talk to the display on this board is:
SSD1306 display(0x3c, 5, 4);
To program the ESP32 board from the Arduino IDE, the trick is to click upload and wait until it starts showing "Connecting........_____.". Then hold the "Boot" button, and let go when it starts uploading code.
For my own future reference (and you never know, this might help someone else), here's my code. I was using Arduino 1.8.10 but have now switched to Visual Studio Code with PlatformIO. (Note that Angle Brackets don't work on Blogger so the include files have quotes in place of them). Don't forget to fill in your own WiFi SSID and Password.
#include "SSD1306.h" // alias for `#include "SSD1306Wire.h"`
#include "WiFi.h"
#include "ArduinoJson.h"
#include "HTTPClient.h"
// Fronius Inverter
const char *HOST = "192.168.86.23";
const char *SSID = "XXXXXX";
const char *PASSWORD = "XXXXXX";
const long kMaxPower = 3300; // maximum watt for the bar graph
const int16_t displayWidth = 128;
const int16_t displayHeight = 64;
// Initialize the OLED display using Wire library
SSD1306 display(0x3c, 5, 4);
void connectToWiFi(const char * ssid, const char * pwd);
void setup() {
// put your setup code here, to run once:
//Serial.begin(115200);
display.init();
// display.flipScreenVertically();
display.setContrast(255);
display.setFont(ArialMT_Plain_24);
display.setTextAlignment(TEXT_ALIGN_CENTER);
connectToWiFi(SSID, PASSWORD);
}
void connectToWiFi(const char * ssid, const char * pwd)
{
WiFi.begin(ssid, pwd);
while (WiFi.status() != WL_CONNECTED)
{
delay(500);
//Serial.print(".");
}
//Serial.print("Wifi connected");
}
void displayThis(String text, long power)
{
display.clear();
display.drawString(displayWidth / 2, 16, text); // x,y
const int16_t barHeight = 8;
display.drawRect(0, displayHeight - barHeight, displayWidth, barHeight);
long barWidth = power * displayWidth / kMaxPower;
display.fillRect(0, displayHeight - barHeight, barWidth, barHeight);
display.display();
}
void loop() {
if((WiFi.status() == WL_CONNECTED)) {
HTTPClient http;
String url = "http://" + String(HOST) + "/solar_api/v1/GetInverterRealtimeData.cgi?Scope=System";
http.begin(url);
// start connection and send HTTP header
int httpCode = http.GET();
// httpCode will be negative on error
if(httpCode > 0) {
// HTTP header has been send and Server response header has been handled
// file found at server
if(httpCode == HTTP_CODE_OK) {
String payload = http.getString();
// Allocate the JSON document
// Use arduinojson.org/v6/assistant to compute the capacity.
//const size_t capacity = JSON_OBJECT_SIZE(3) + JSON_ARRAY_SIZE(2) + 60;
DynamicJsonDocument doc(900);
// Parse JSON object
DeserializationError error = deserializeJson(doc, payload);
if (error) {
//Serial.print(F("deserializeJson() failed: "));
//Serial.println(error.c_str());
return;
}
// Extract current power generated from the Fronius inverter
long generatedPower = doc["Body"]["Data"]["PAC"]["Values"]["1"];
String displayedPower = String(generatedPower) + " W";
displayThis(displayedPower, generatedPower);
}
} else {
displayThis("HTTP Error", 0);
//Serial.printf("[HTTP] GET... failed, error: %s\n", http.errorToString(httpCode).c_str());
}
http.end();
} else {
displayThis("Wifi Error", 0);
connectToWiFi(SSID, PASSWORD);
}
delay(5000);
}
I've added a bar that shows how much of the maximum output of the panels we're at. Not in the code above but it's pretty simple using the excellent display library.
Update: now building under PlatformIO
I prefer to develop using Visual Studio Code and PlatformIO but initially ran in to trouble getting it to work with the ESP32. This tutorial gave me the key, which is to use the "Espressif ESP32 Dev Module" as the board.
One reason why I prefer using VSC to edit is the excellent code completion:
The Arduino IDE has a lot of weirdness compared to what I'm used to.


hey! you did a great job!
ReplyDeleteI am using parts of your code to send date e.g. to node-red and to influx to show everything in grafana.
You only did extract the actual power the inverter generates. But it would be nice if you also could extract the information about the actual value of the electricity meter. I mean the power which is actualy in use respectively the power which is actualy going into the grid.
At the moment I read this value by an LDR sensor directly at my electricity meter. But I want to use the data of the smartmeter to get rid of the additional device at my electricity meter.
Can you help me somehow?