Saturday, June 29, 2024

Micropython thermometer using MCP9808 and SSD1306 OLED display

This little post was triggered by reading Owen Duffy's post titled "Arduino thermometer using DS18B20 and OLED display". Even though I'm quite comfortable writing C or C++, I've been enjoying the clean MicroPython environment. These days I've pretty much switched from classic Atmel Arduinos to RP2040 based boards.

I implemented this little thermometer in just a few minutes with two easy to find and install libraries. Here's how it looks:


And here is the code:

import time

from machine import Pin, SoftI2C

import ssd1306

from micropython_mcp9808 import mcp9808


i2c = SoftI2C(sda=Pin(6), scl=Pin(7), freq=100_000)

display = ssd1306.SSD1306_I2C(128, 32, i2c)

mcp = mcp9808.MCP9808(i2c) # , address=0x18)

time.sleep(0.5)

while True:

    temp = mcp.temperature

    #print(temp)

    time.sleep(5.0)

    display.fill(0)

    display.text(f"{mcp.temperature:.2f}C", 30, 15, 1) # x,y,colour

    display.show()

The imported modules are mcp9808 for the i2c temperature board and ssd1306 for the OLED display.

I use Thonny for editing, uploading and debugging.

One mystery is that the hardware I2C isn't working for me on the RP2040 board but SoftI2C works fine.

When getting started I scan for I2C devices like this:

i2c = SoftI2C(sda=Pin(6), scl=Pin(7), freq=100_000)

devices = i2c.scan()

print("devices: ")

for device in devices:

    print("0x{0:02x}".format(device))

Obviously adjust for the pins you've used. The RP2040 is a wonderfully powerful chip. The board I used here is from Seeed studio.

Cheers to Owen for all his great insights and sharing.

ChatGPT is very good at Micropython

While I'm here, an observation about the utility of the Large Language Models. I have been asking ChatGPT to write code to demonstrate how to do things and it's really good!


Around the house I have little devices that use Wifi to poll my solar inverter and show power use and generation. I've been using a third party JSON parser but I asked ChatGPT how to do it and it mentioned a built-in JSON parser that I wasn't aware of!

Built the Sputnik regenerative receiver

When I was a teenager and just starting to tinker with electronics I built a regenerative receiver kit from the local Tandy (RadioShack) store. It was a great success and I was able to listen to the big shortwave broadcasters on it.

I know that Bill often mentions that regenerative receivers may be haunted on his Soldersmoke blog. The DX Explorer site describes a rather neat regenerative receiver named Sputnik. The author also links to a way to order a very nice board from PCBWay. I ordered and quickly received five copies of a very nicely done board.

Most of the components I had but the ten turn pot had to be ordered in. I used a T50-2 toroid core rather than the air-core inductors. At first it didn't oscillate. My initial thought was that the tickler coil was not the right polarity but it turned out that my 2N2222s have collector and emitter reversed. Ralph, VK3ZZC, suggested that they might be fakes but the gain seemed fine.

The coil has a single turn that can be connected to a frequency counter. I have it going to my CRO and it's helpful for reading frequency and seeing when regeneration is starting. While you can, kind of, listen to single sideband, AM is best. Here's a bit from 7125 this morning.


I didn't have any 1N4001s in stock and tried another power rectifier that didn't seem to work as a varicap diode. I did have a genuine varicap in the junk box but it was too sensitive. Richard, VK3LRJ, gave me some 1N4004s and they work fine although tuning is very sensitive.

The radio is pretty hard to operate and one must juggle, RF gain, tuning and regeneration.


My memory might be rosy but the Tandy pegboard kit was easier to use than this design. It might be this one. There's a lot more electrical noise around these days and many of the big shortwave broadcasters have gone so perhaps the golden age of listening to BBC on a three transistor radio are over.


Monday, June 24, 2024

Flying like a bird, the joy of FPV drone operation

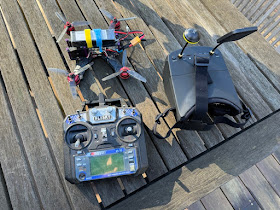
Some years ago I used to accompany Terry to a field in Sydney where he would fly amazingly fast while using a video headset. He would run through an obstacle course with hoops standing on the oval. I tried a few times but crashed immediately - I could never put myself in the drone and was always thinking of the sound.

My current drone is home built and rather bashed about but does the job.


One problem I've had is that I need my glasses to see the screen clearly and the solution was to sacrifice an old pair of reading glasses and apply some hot glue.


There is a bit of open space and a tree in the middle so I started slowly and have had a bit of a breakthrough. I was able to take off, fly around the tree, and return and land without breaking anything.

A few days on and I've probably had about ten successful flights and it is a real joy to experience.

Last night, after a hard landing, the drone was not flying well and I lost control. I couldn't see when it was but could see the video from its point of view. It was stuck in a tree. A squid pole was very handy in dislodging it. Next step is to add a buzzer so I can locate it after an uncontrolled landing.


Saturday, June 22, 2024

Listening to the BBC Antarctic Midwinter Broadcast

Tuned to 9585KHz and the BBC's Antarctic Midwinter Broadcast is on. A charming shortwave program with information and messages from family at home. Good signal here in Victoria.


I'm using an Airspy HF+ via SDR++ in server mode. Thanks to Stephen, VK2BLQ for the tip.

Thursday, June 20, 2024

ABC Radio spot about technology

Talked technology on ABC Nightlife with Dom Knight: AI seems to be taking jobs already, AI being used to protect call centre workers, NotebookLM a great new research tool and Adobe being sued for misleading customers.

https://www.abc.net.au/listen/programs/nightlife/peter-marks/104000522

Monday, June 17, 2024

USB-C cables have vastly different capabilities

USB-C is a wonderful standard. Apart from the ability to plug it in either way up, it supports Power Delivery and much higher speeds.  I've run in to some mystifying scenarios where a cable would charge but not carry data, would carry data but not charge, and lower than expected data throughput.

I'm a registered Apple developer and was keen to try out the macOS 15 Sequoia beta but I'm not an idiot so decided to install it on an external disk on my Mac mini.

The steps were:

  • Used Disk Utility to format a Samsung T5 drive as APFS
  • Downloaded the Sonoma macOS installer via the App Store
  • Installed Sonoma macOS 14 on the external drive
  • Booted from the external drive and enabled Beta Updates in the Software Update settings and chose macOS 14
  • When all that was done I booted from the external drive.
Sequoia seems quite stable and I've been able to build my applications with the Xcode beta.

But.... it did seem rather slow! I used the Blackmagic disk speed test to measure the drive and got Write: 38.9 MB/s & Read: 39.3 MB/s. 

The USB3.1 port is capable of 10Gb/s or 1,250MB/s so something is up.

Changing USB-C cables to one marked as 10Gbp/s I re-measured and got Write: 263.6MB/s & Read: 344.9MB/s. Almost 10x improvement but well short of what's possible.

Today, I bought a 1TB Western Digital drive. Blackmagic gave me Write: 804.1 MB/s & Read: 906.8 MB/s.

The Mac mini has two Thunderbolt/USB4 ports that are capable of up to 40Gb/s so I have ordered a Thunderbolt enclosure.

Oh, and just a note that the speed of the internal SSD on a mac is pretty amazing. Blackmagic measures the internal SSD as Write: 3049.6 MB/s & Read: 2856.4 MB/s. I guess that's why I noticed the slow speed.

Summary: If things seems slow, try another USB-C cable. (I wish they had a standard for markings on the cables with their capabilities).

Update: faster external disk

Wanting to get closer to the speed my interfaces are capable of I ordered an NVMe SSD stick and case from AliExpress. Plugged in to the USB-C socket on the back of the Mac mini I get the same speed plugged in to the USB-C hub outlets on my monitor so I'm using that. Speed is pretty good. Close to 1GB/s.


The enclosures are pretty nice. Mine came with a heatsink, sticky pad and even the screwdriver needed to open it. Not as small or neat as the Samsung T5 but five times faster.


Update 2: even faster external disk

On my quest for a faster external drive to boot from I ordered a SanDisk Professional drive and plugged it in to the USB-C socket on the back of the Mac mini. At 2,677 MB/s this is getting pretty close to the internal drive speed.


It came pre-formatted as APFS.

Friday, June 14, 2024

How to spread misinformation

I've been seeing a lot of misinformation lately and noticing the techniques used. While discussing this with friend Tony, I wondered if ChatGPT could list ten effective ways to do this.

"Spreading misinformation effectively, while unethical and harmful, often employs psychological and social manipulation. Here are ten techniques commonly used:

1. Emotional Appeals: Crafting messages that trigger strong emotions, such as fear, anger, or joy, can bypass critical thinking and make the information more memorable and persuasive.

2. Repetition: Repeating a false statement frequently can make it more familiar, leading people to believe it's true (the "illusory truth effect").

3. Selective Presentation: Sharing only specific facts or stories that support the misinformation while omitting contradictory evidence creates a biased view.

4. False Authority: Citing fake experts or misrepresenting the credentials of individuals can give false information an air of credibility.

5. Echo Chambers: Sharing misinformation within closed or like-minded groups reinforces the false beliefs, as members are less likely to encounter opposing views.

6. Manipulated Content: Using doctored images, videos, or audio clips to create convincing but fake evidence supporting the misinformation.

7. Bots and Trolls: Deploying automated accounts and paid individuals to amplify misinformation across social media platforms, making it seem more widely accepted.

8. Headline Manipulation: Crafting sensational, misleading, or clickbait headlines that can spread quickly even if the actual content is less inflammatory.

9. Conspiracy Theories: Developing complex narratives that explain events through secret plots, which can be compelling and difficult to disprove.

10. Astroturfing: Creating the illusion of widespread grassroots support or opposition through fake reviews, comments, or social media activity.

These methods exploit cognitive biases, emotional responses, and the structure of information dissemination in the digital age to spread and entrench misinformation."

I wonder if some sort of score-card could be made that analyses a published story in terms of these factors?

Sunday, June 09, 2024

Raspberry PI Pico with USB-C not working? Try a USB-A cable.

It's a pity the Raspberry Pi PICO comes with the horrible micro USB socket. I purchased what, I guess, is a PI Pico clone board with a USB-C socket on it from AliExpress but was disappointed when none of them seemed to appear on the USB bus.


On a whim, I plugged one in to my computer with a USB-A to C cable and up it came! My guess is that somehow the USB-C wiring isn't right and a proper USB-C port doesn't power on. Anyhow, they work fine and I've now flashed MicroPython v1.23 on to them and all works well.

Thursday, June 06, 2024

A nice review of WSPR Watch in German magazine FUNK Amateur

My thanks to Stephen Rapley, VK2RH, for passing on this review of ham radio software that gave my WSPR Watch app a high rating. 

It's in the latest June issue of German amateur radio magazine FUNK amateur.

Translating the text with Google Translate I get:

"Who can hear me? Where can I be heard? Who can I receive? These questions can be answered with the WSPRwatch app. Your own reception reports and those of other stations can be displayed in a list, on a map, Figure 1, or as a graphical evaluation. However, the information does not only come from WSPRnet, as the name suggests. Timebase DB, Reverse Beacon Network and PSK Reporter can also be selected as data sources.

Users have a wide range of setting and filtering options at their disposal.

The data can be exported in CSV format for other applications. 

Linking the app to your own QRZ.com account adds further information to the spots displayed, such as the name and exact location of the call sign owner."


Stephen added "You appear at the top of a list of apps ranked by “Nutzerbewertung”! (User ratings)."

Thanks again Stephen.

Wednesday, June 05, 2024

Technology news on ABC radio

Had a nice chat with the brilliant Dom Knight about technology news including Ticketek, Windows Recall, Face recognition failures, Google AI summaries, "filmmaker" mode on TVs and what to expect from Apple's developer conference next week. 

You can hear it here.

I've been working on the acoustics in my home studio. It was a bit of an echo chamber so this week I hung a blanket from the ceiling behind me and it seems to work nicely.

Sunday, June 02, 2024

Scientific glassblower still going at UC Berkeley

I don't normally post links but this story caught my attention and deserves more coverage.


It's not that long ago that I bought some test tubes from a place on Harris Street, Ultimo, Sydney. They had a scientific glass blower working at the time. 

Sending audio to two devices on macOS

This morning I saw that the (very active) Bendigo Amateur Radio and Electronics Club were transmitting RTTY on 7.035. When I'm not in the shack I often leave an AirSpy HF+ running connected to SDR++ in server mode. This means I can sit by the fire and tune around on HF.

To decode a digital mode audio must be fed to FlDigi. I use BlackHole for routing audio from one app to another but I wanted to hear the audio as well so needed a way to send audio from the SDR++ app to both my speakers and a loopback for FlDigi. 

The trick on macOS is in the Audio Midi Setup app. Create a new "Multi-Output Device" and set the outputs to both BlackHole and your normal audio output (I use headphones with speakers plugged in to them. 


The audio output in the SDR software is set to send to the Multi-Output Device.


FlDigi is set to get input audio from BlackHole.


The final result is audio I can hear but also decode in FlDigi. Here's a bit of the BAREC broadcast.


Thanks BAREC for running the digital broadcast. I think it's great to have some regular signals on the band that aren't just FT8.